

No products in the cart.
Return To Shop


Laser engraving slate
I got my laser machine primary for cutting, but lately I’ve been getting hooked on engraving as well. Mostly I’m fascinated by engraving on stone, such as slate. I see a lot of people making fun things like drink coasters and cheese cutting boards.
It wasn’t easy obtaining slate stone here in US. Online it’s very expensive, and I wasn’t able to find it regular stores, although I’m yet to go to dedicated tile shops. Fortunately someone gave me few large pieces of old roof slate, and I was able to practice some engraving.
This turned out to be much harder than I expected. There are so many variables one have to take into account making engraving challenging. Slate stone has variations in color, and it seems that the darker stone, the better it is for engraving. Where laser marks stone material, it becomes lighter. So image becomes inverted. In order to engrave on dark stone, you first have to invert image in photo editing program.
But before you even touch laser, you must edit it and drastically reduce details. There are better guides than this on how to prepare image for engraving, but I’ll mention few points.
Quick guide to preparing photos for engraving:
- Remove background if possible. This works best for photos where main subject is against solid background, such as blue sky or single color wall.
- Convert image to Greyscale or B&W.
- Increase contrast and brightness and adjust levels
- Finally change image mode to Bitmap and invert colors.
- Save as BMP
Here’s an example image of Zebra, that when thru this process.
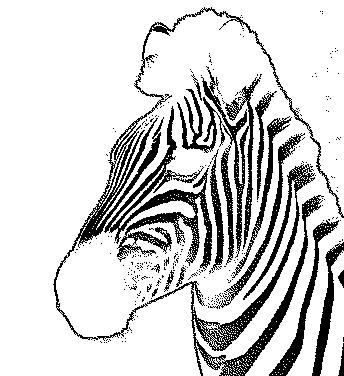
Please note that I also added outline to it. This way it will look better when engraved.
One more thing that a lot of guides mention is to keep image at pretty high DPI (200 or more). This is probably a good idea for larger image, but I just wanted to create something small, so mine is only 72dpi.
I imported image into RDWorks software, loaded slate into the laser cutter, adjusted height to a correct distance (for my 2″ lens) and started to play with settings.
I decided to keep speed at constant 200 mm/s and adjusted laser power and scan gap.
Scan gap controls how far your each line that laser etches from previous one. In theory it allows greater resolution, but as I discovered it in my case default gap of 0.1mm worked the best. With smaller gap you also doubling time it takes to engrave so win-win! 🙂
Laser power setting controls how strong laser beam is hitting the stone. Initially I thought that higher power would yield better results, but it was just the opposite. Lower power in fact made brighter etching, and I found that it was best between 15-20%. But again even slight variation in color will affect the outcome so it’s a lot of trial and error.
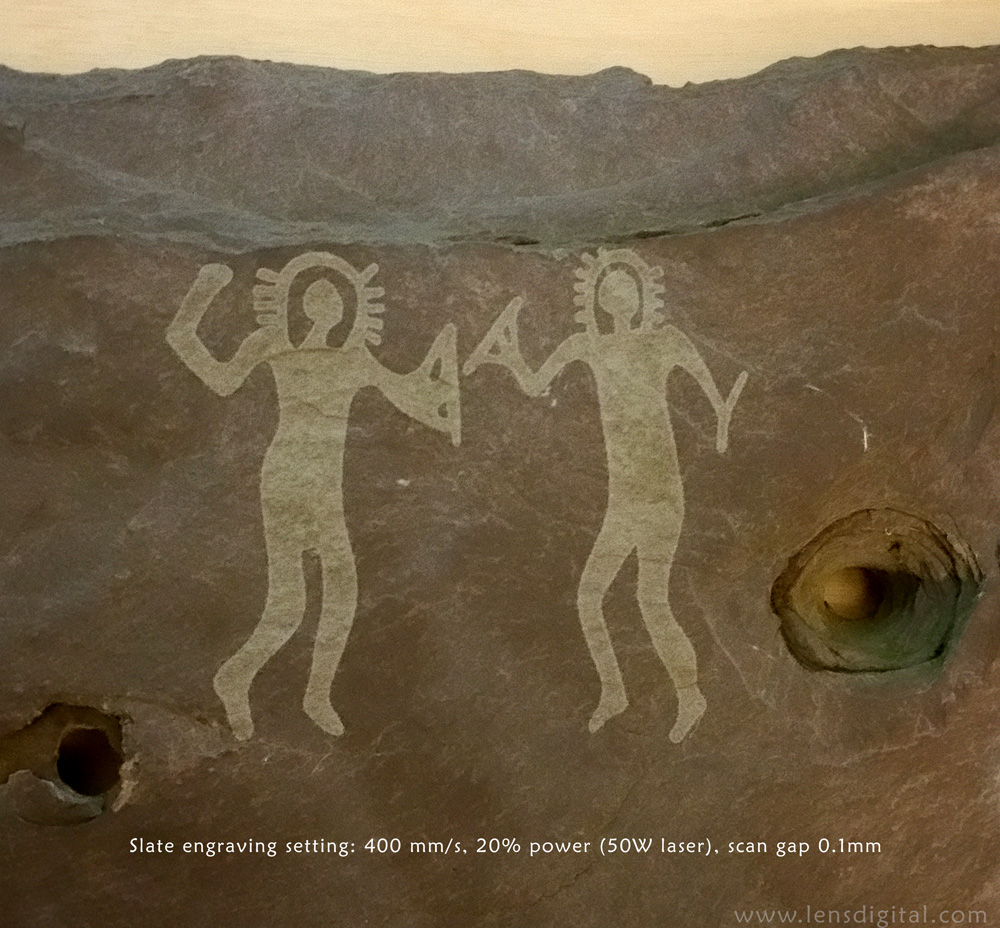
Next I tried a solid illustration (non-photographic) of alien petroglyphs. Results were very different from engraving photo of zebra this time. It actually looked the best at lowest possible setting of 10% power, but not all details got etched. I realized that I need to play with the speed, so I’ve tried upping speed but kept power at 20%. Finally at 400 mm/s I got what I think is perfect result!
I’m still far from expert on engraving, but I’m hoping that someone will find this post useful as good starting point.


Related posts

Help! Why is my image mirrored!? We have ALL been here. It’s frustrating. The image is mirrored and now your design is screwed up. How... Continue reading

Has this ever happened to you? You’ve created the perfect design in your graphics software, set up your cup on the rotary (hopefully a PiBurn!),... Continue reading

So, you want to run tumblers! But which rotary is best? We asked 50 people with the PiBurn what their favorite rotary was. ... Continue reading

I’ve been using RDWorks to send jobs to my Laser machines for many years. Fortunately there’s a new game in town and it’s software called... Continue reading

Boss Laser Mirror Alignment Tools Last week we’ve launched new product in our store under slogan “No More Tape!”. It’s set of mirror alignment jigs... Continue reading
One comment on “Laser engraving slate”
Tyler Harney
Wow you got it right on the money! Thanks for this post!
That last engraving setting, 400mm/s, 20% power, scan gap 0.1mm worked perfectly on my 50w machine.