

No products in the cart.
Return To Shop


DIY Pin Table for laser cutter
If you just doing laser engraving, you don’t really need to worry much about supporting your objects, however when you cutting them, it’s another story. Laser beam slices thru material and continues to whatever lies beneath. If it’s just plain metal table it will reflect back scoring or melting your object from underneath. This is called flashback.
That’s why most people use some kind of support that provides minimal contact with working object. Most popular one is honeycomb table.
However problem with it that it’s pricey, not something that you can easily make on your own, and it still has too much contact with the object. From what I read they also wear out with time.
In my opinion pin table is the best solution. On such table object is supported by rows of pins. Besides having more advantages than honeycomb table, it’s also super easy and inexpensive to make! I made mine in just couple of hours, and it cost me just under $60 to make.
Overview:
There’s nothing too tricky in this project. You need a sheet of aluminum 1/4″ thick and as big as your cutting area. I found a piece of 12″x24″ (actually bigger than cutting area of my laser machine, but it still fits) of good quality 6061 aluminum on eBay. As for actual pins I used pop rivets from hardware store. Finally I attached 2 aluminum angles on the bottom to give rivets some clearance. If you use thicker aluminum and rivets do not poke thru, you don’t even need this extra support!
Parts Needed:
| Qty | Part | Price | Source |
|---|---|---|---|
| 1 | 12″x24″ 1/4″ thick Aluminum Plate | $42 (w/ shipping) | eBay |
| 1 | Box of rivets . Arrow 1/8″ 3mm | $5.28 | Lowes |
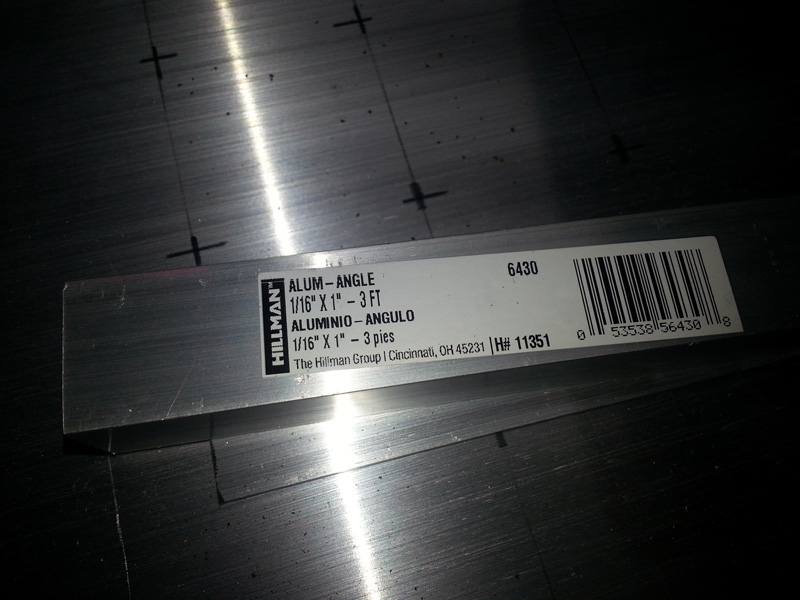
| 1 | Aluminum angle (3ft x 1″) | $5.05 | Lowes |
| 4 | #10-24 machine screws (about 1/2″ long) | $1 | Hardware store |
| 4 | #10-24 hex nuts | $1 | Hardware store |
| 1 | Steel Square Tube, preferably perforated (optional) | $6 | Hardware store |
[fusion_builder_container hundred_percent=”yes” overflow=”visible”][fusion_builder_row][fusion_builder_column type=”1_1″ background_position=”left top” background_color=”” border_size=”” border_color=”” border_style=”solid” spacing=”yes” background_image=”” background_repeat=”no-repeat” padding=”” margin_top=”0px” margin_bottom=”0px” class=”” id=”” animation_type=”” animation_speed=”0.3″ animation_direction=”left” hide_on_mobile=”no” center_content=”no” min_height=”none”][fusion_alert type=”success” accent_color=”” background_color=”” border_size=”1px” icon=”” box_shadow=”yes” animation_type=”0″ animation_direction=”down” animation_speed=”0.1″ class=”” id=””]You need to make sure that all rivets are equal height. As this might not be possible to do without opening box, check if store has good return policy. I had good luck with Arrow brand rivets from Lowes. Square tube is recommended (to make a jig so you can drill straight holes without drill press) but not required.[/fusion_alert]
Tools Needed:
[/fusion_builder_column][fusion_builder_column type=”1_1″ background_position=”left top” background_color=”” border_size=”” border_color=”” border_style=”solid” spacing=”yes” background_image=”” background_repeat=”no-repeat” padding=”” margin_top=”0px” margin_bottom=”0px” class=”” id=”” animation_type=”” animation_speed=”0.3″ animation_direction=”left” hide_on_mobile=”no” center_content=”no” min_height=”none”][fusion_checklist icon=”fa-wrench” iconcolor=”#81d742″ circle=”no” circlecolor=”” size=”small” class=”” id=””]
[fusion_li_item icon=””]Drill Press or Power drill with drill guide[/fusion_li_item]
[fusion_li_item icon=””]1/8″ drill bit for metal[/fusion_li_item]
[fusion_li_item icon=””]3/16″ drill bit for metal[/fusion_li_item]
[fusion_li_item icon=””]Safety glasses[/fusion_li_item]
[fusion_li_item icon=””]Hack saw Screwdriver[/fusion_li_item]
[fusion_li_item icon=””]Metal ruler (24″ or longer)[/fusion_li_item]
[fusion_li_item icon=””]Pencil or marker (that can draw on metal)[/fusion_li_item]
[fusion_li_item icon=””]Clamps[/fusion_li_item]
[fusion_li_item icon=””]Countersink bit or round file (optional)[/fusion_li_item]
[fusion_li_item icon=””]Metal punch & hammer (optional)[/fusion_li_item]
[/fusion_checklist]
[/fusion_builder_column][fusion_builder_column type=”1_1″ background_position=”left top” background_color=”” border_size=”” border_color=”” border_style=”solid” spacing=”yes” background_image=”” background_repeat=”no-repeat” padding=”” margin_top=”0px” margin_bottom=”0px” class=”” id=”” animation_type=”” animation_speed=”0.3″ animation_direction=”left” hide_on_mobile=”no” center_content=”no” min_height=”none”][fusion_alert type=”success” accent_color=”” background_color=”” border_size=”1px” icon=”” box_shadow=”no” animation_type=”0″ animation_direction=”down” animation_speed=”0.1″ class=”” id=””]Drill press is highly recommended, because you need to make sure you drill absolutely straight. There are drill guide/jigs that will let you do that, and in fact you going to need something like that even if you have a drill press because you won’t be able to reach far enough to drill middle row. I will explain how to make such jig if you don’t have one.[/fusion_alert]
Making it.
[/fusion_builder_column][fusion_builder_column type=”1_1″ background_position=”left top” background_color=”” border_size=”” border_color=”” border_style=”solid” spacing=”yes” background_image=”” background_repeat=”no-repeat” padding=”” margin_top=”0px” margin_bottom=”0px” class=”” id=”” animation_type=”” animation_speed=”0.3″ animation_direction=”left” hide_on_mobile=”no” center_content=”no” min_height=”none”][fusion_alert type=”custom” accent_color=”#ffffff” background_color=”#dd3333″ border_size=”1px” icon=”fa-exclamation-triangle” box_shadow=”yes” animation_type=”bounce” animation_direction=”down” animation_speed=”0.1″ class=”” id=””]Warning: Working with power and even hand tools can be dangerous! Please use all safety precautions, proceed at your own risk. I will not be held responsible for any accidents and cannot guarantee your safety![/fusion_alert]
Make a grid
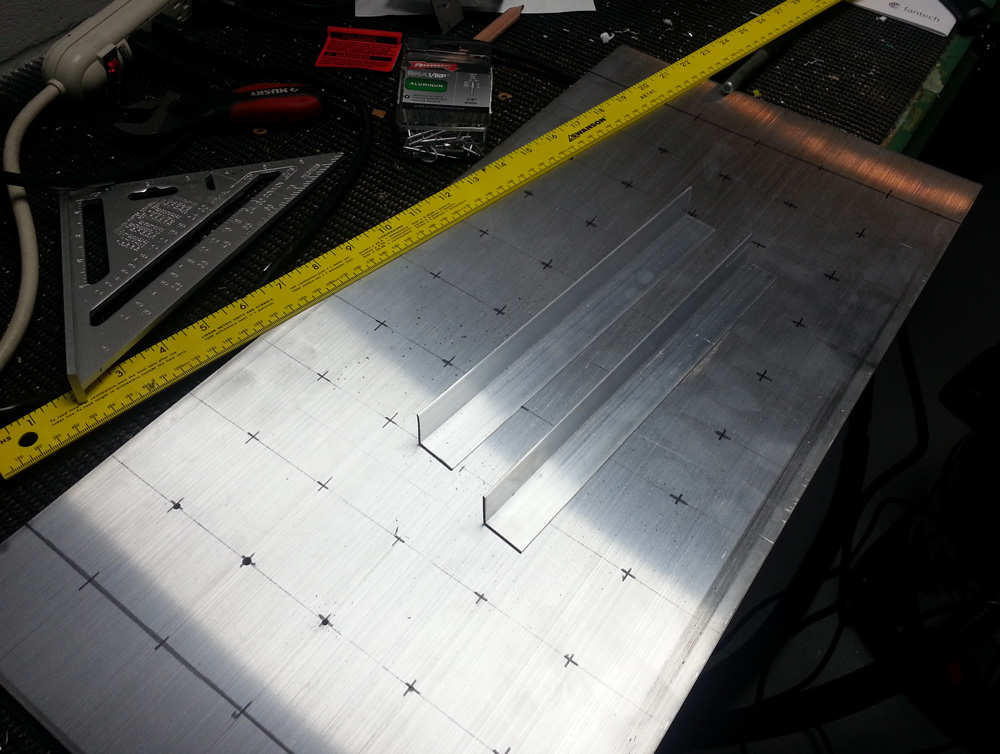
I chose to to add pins every 2 inches (about 1 cm). This evenly divides 12×24 piece of metal into grid. Mark on 2 inch intervals on each side, then opposite side and connect with lines using ruler and pencil or marker.
Repeat from other side, until you have a grid.
Now using punch tool and hammer make small indentations at gird intersections. This is optional, but will make it easier to drill.
Make them holy!
6060 aluminum is easy material to drill, especially with drill press. Please be careful and wear eye protection, it’s not optional! Metal shavings will be flying around.
I used 1/8″ drill bit as it matched heads of the rivets I was using. If yours are different make sure to use correct bit.
With my drill press I was not able to reach middle row, so I had drill it by hand. As I mentioned it is important to drill as straight as possible. They sell special drill guides for this, but I decided to make one from a steel perforated square pipe I had laying around. Using drill press I just drilled it thru. After that I placed it on the aluminum plate aligned the hole (this is where perforations help you to see) and clamped it down. Then I drilled with power drill thru the jig and into the aluminum. I had to reset it for each hole.

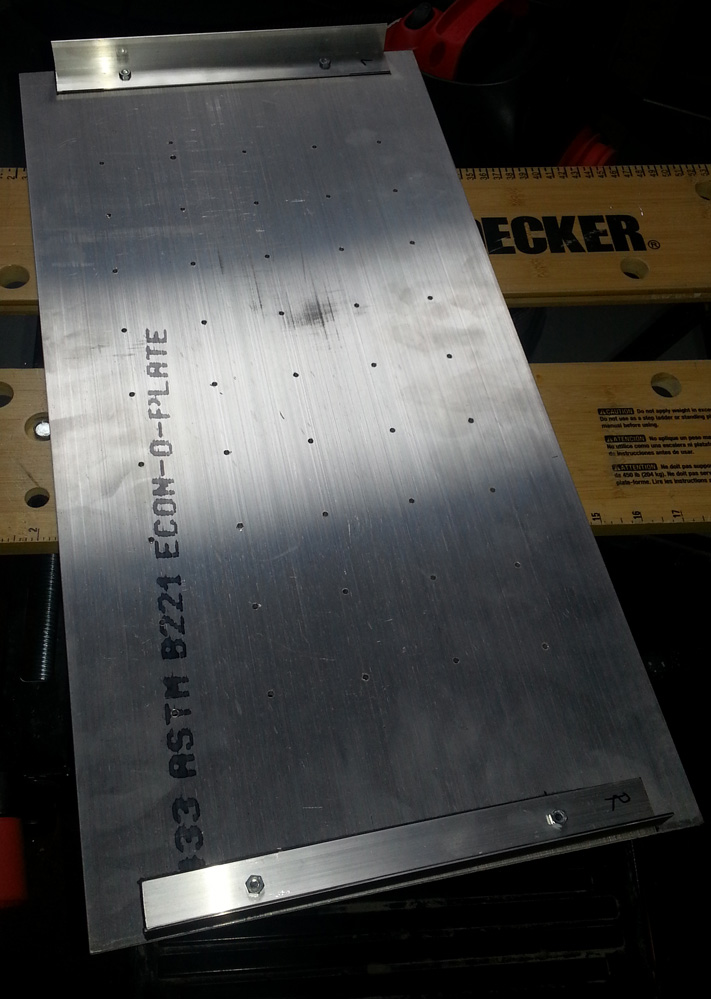
Support legs
Because my rivets were longer than 1/4″ aluminum plate, they were poking from the bottom. For this I made some supports out of cheap aluminum angles.
First you’ll want to cut aluminum angle pieces to correct lengh. I cut mine to 10″ long pieces with hack saw. Miter saw will also work.
Using 3/16″ bit drill two holes in first aluminum angle, approximately 2 inches from edges. Deburr sharp hole edges with countersink bit or round file. Using this piece as template mark holes on second piece. Drill and deburr second piece.
Flip your aluminum sheet and place first aluminum angle piece so it’s flush with the (short) edge. Mark holes. Do same with with other piece on other edge. Pause for a minute, look it over, imagine how it will be standing on these aluminum angles as legs. Punch marked holes and drill using drill press and 3/16″ bit. Deburr.
Assemble
3/16″ hole make very tight fit for 10-24 machine screws. Insert or screw in (if tight) machine screws from the top of the aluminum plate. Turn it around and insert aluminum angles. You might have small problem here if holes didn’t match perfectly. If so slightly enlarge holes in aluminum angles with bigger drill bit or round file until you are able to insert them into machine screws. Tightly secure with hex nuts.
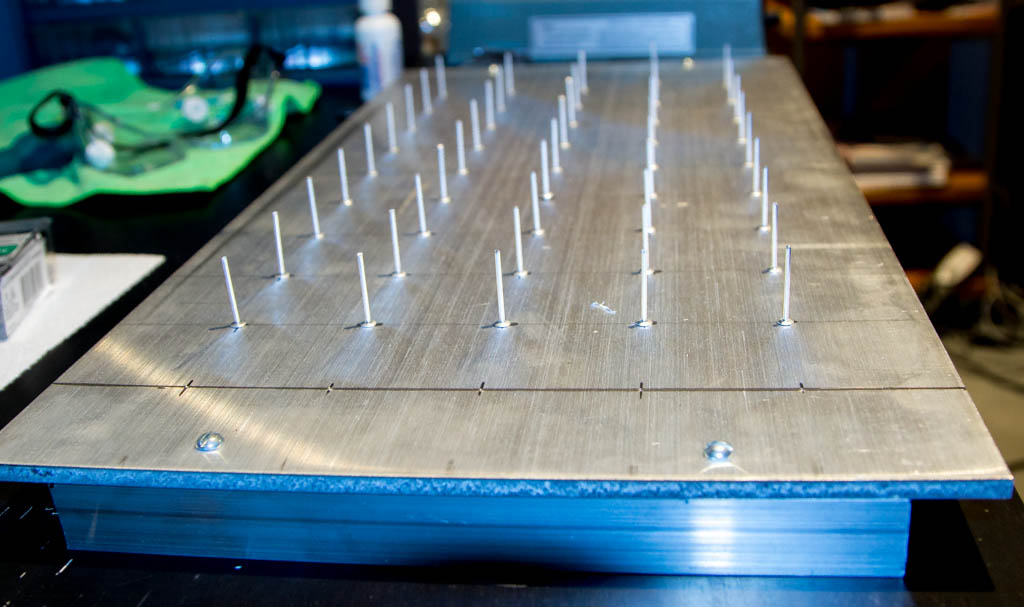
Flip it around and start inserting rivets. That’s it, you are done!
Final thoughts
While my pin table works great so far, rivets are a little loose in their holes. I’ve seen some people use epoxy to fix them in place, but I’m not sure how toxic it might get if hit by laser. There might be other ways to secure them (i.e. pieces of tape or solder), but I’ll leave that up to your imagination 🙂
Update:
I made some improvements to the original design. Read about it here.
[/fusion_builder_column][/fusion_builder_row][/fusion_builder_container]


Related posts

Help! Why is my image mirrored!? We have ALL been here. It’s frustrating. The image is mirrored and now your design is screwed up. How... Continue reading

Has this ever happened to you? You’ve created the perfect design in your graphics software, set up your cup on the rotary (hopefully a PiBurn!),... Continue reading

So, you want to run tumblers! But which rotary is best? We asked 50 people with the PiBurn what their favorite rotary was. ... Continue reading

You might already know how versatile PiBurn Rotary Attachment is, but did you know that it can also make Popcorn? Continue reading

I’ve been using RDWorks to send jobs to my Laser machines for many years. Fortunately there’s a new game in town and it’s software called... Continue reading
3 comments on “DIY Pin Table for laser cutter”
Pingback:
LensDigital – DIY Pin table UpdateWilliam
This is a great guide, can we copy a link to it from the Laser Engraving and Cutting facebook group. We have over 250 members that would love to see it . https://www.facebook.com/groups/441613082637047/
bratan
Of course! Thank you