

No products in the cart.
Return To Shop


DIY Fume Extractor for laser cutter
If you have a laser cutter/engraver machine, you know how import it is to get rid of the toxic and stinky fumes it creates, especially if you are cutting and engraving plastics.
There are generally two options for getting rid of fumes. Either vent them outside, or use some kind of filtration system or both. Since my laser cutter is located in the basement and I currently have no simple way of getting ventilation to outside I knew I needed a recirculating fume extractor. Device like that will intake all the fumes, filter them out and blow out clean air, all of it staying in the room.
One problem in getting one is the cost. These filters costs sometimes as much as laser cutter itself, sometimes even more. And then you have to buy specific or propitiatory filters which also not cheap as well.
That’s why I chose to build my DIY extractor. There were about 3 designs I could find online, and the best one in my option was from this Instructable. So that’s what I eventually build. You might ask what am I writing about here? Well original article was great, yet I found it lacked some details. My goal in this post is to document and explain my build, as well as provide missing pieces, basically a build log. I’ll have more pictures and videos, so between this post and original instructable it should be easier to figure out how to build one 🙂
Before you begin, keep in mind that even this solution is cheaper than industrial filtration systems, it still cost me about $567.
About design and how it works.
Powerful industrial fan takes air from the laser cutter and pushes it thru a 4 stage filtering system:
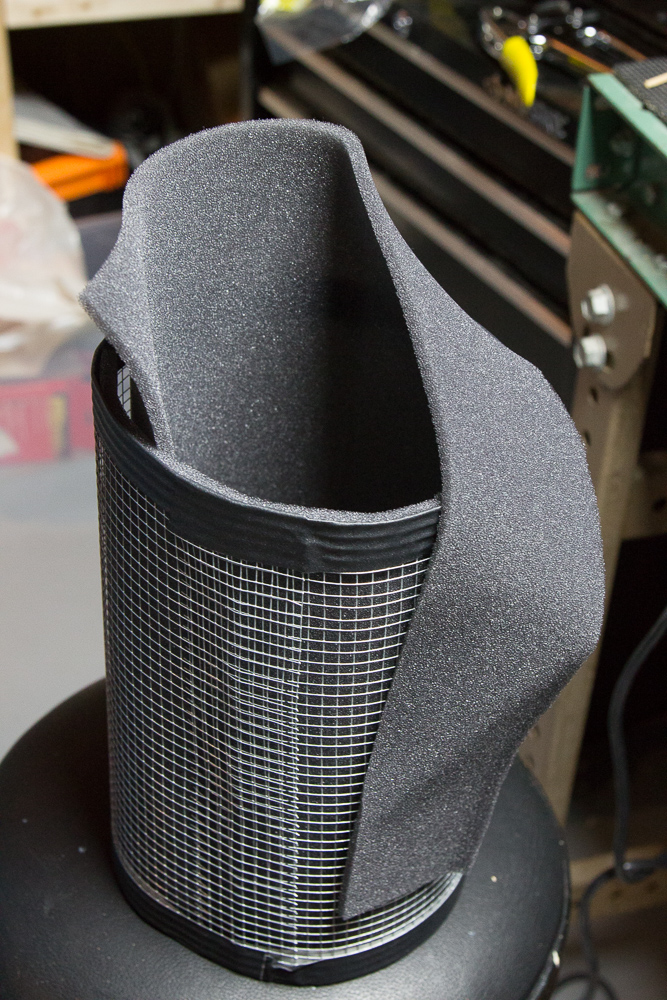
- First stage: Foam pre-filter. Made out of inexpensive air conditioner foam filters it traps large particles and extends life of the more expensive 2nd stage filter
- Second Stage: Off the shelf Honewell HEPA filter removes 99.97% of airborn particles as small as 0.3 microns. Together with stage 1 filter these take care of any particles or dust coming from laser cutter.
- Third stage: Activate carbon (charcoal) layer creates a filter that removes all vapor impurities from the air. This get’s rid of toxic smoke and smell. This one is the most expensive filter, however it should last a long time (I’m hoping at least a year).
- Fourth state: Final or post-filter made of foam fiberglass like polyester. It traps fine carbon particles coming from third stage filter
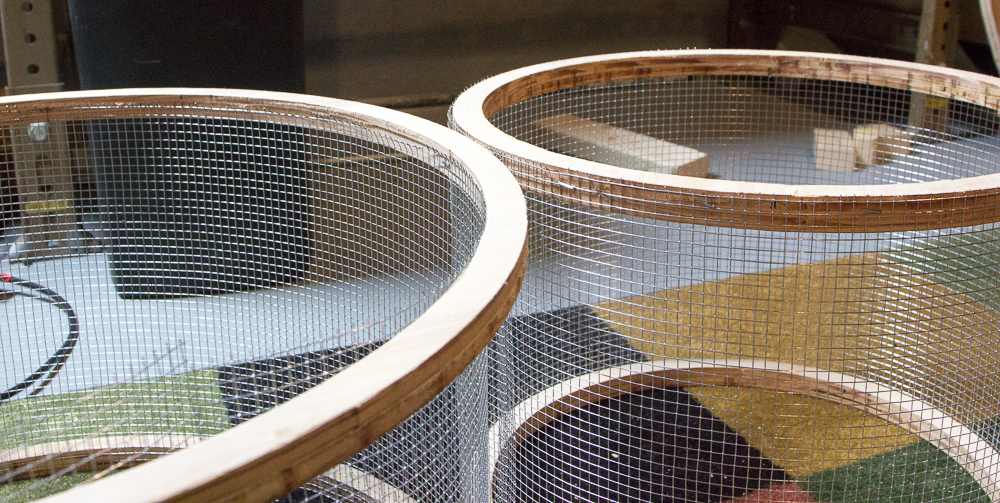
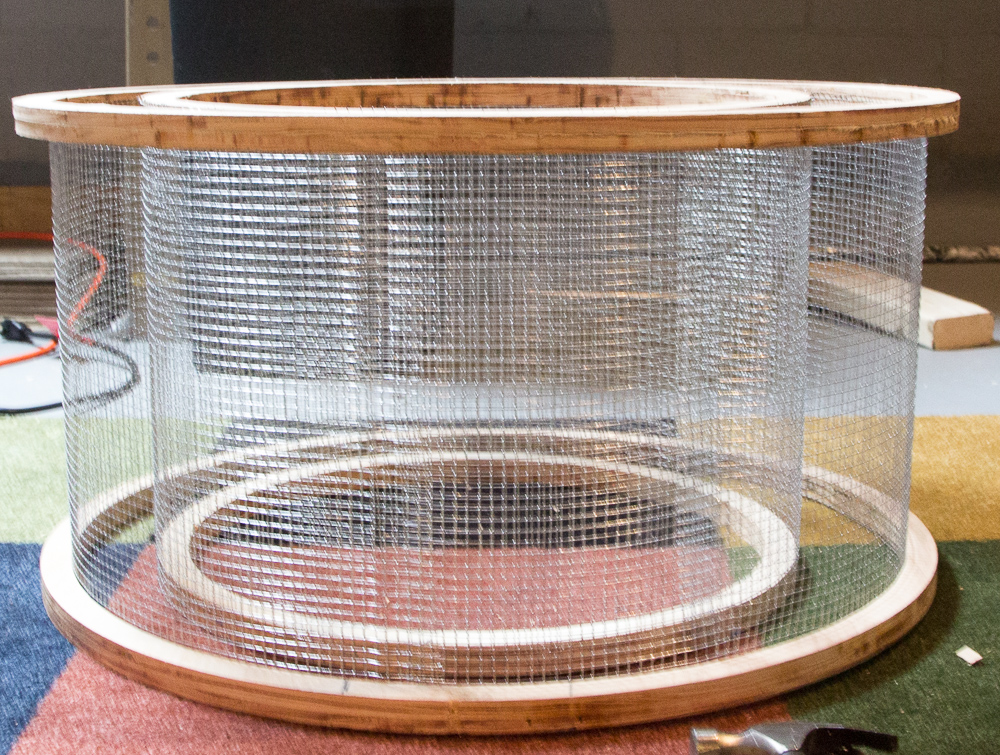
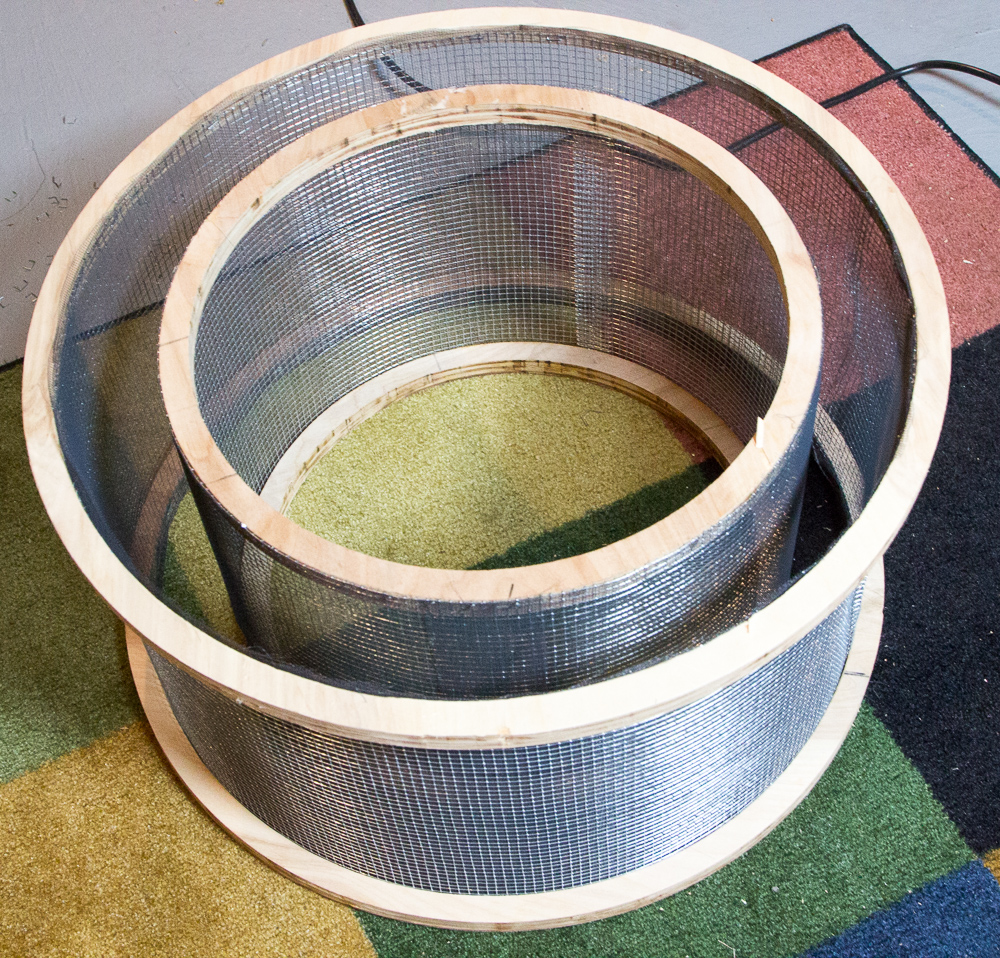
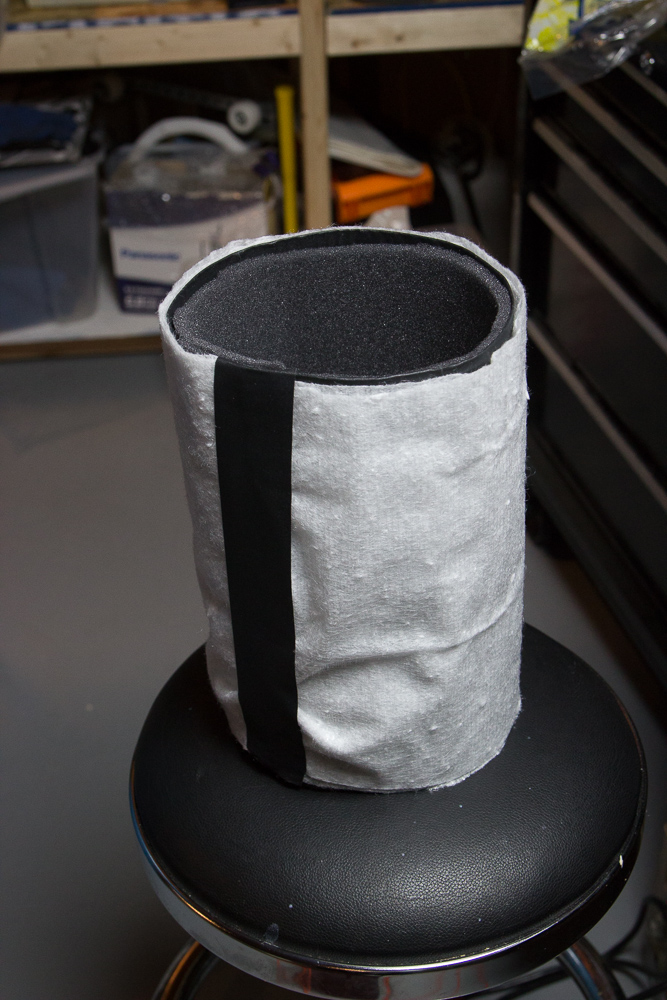
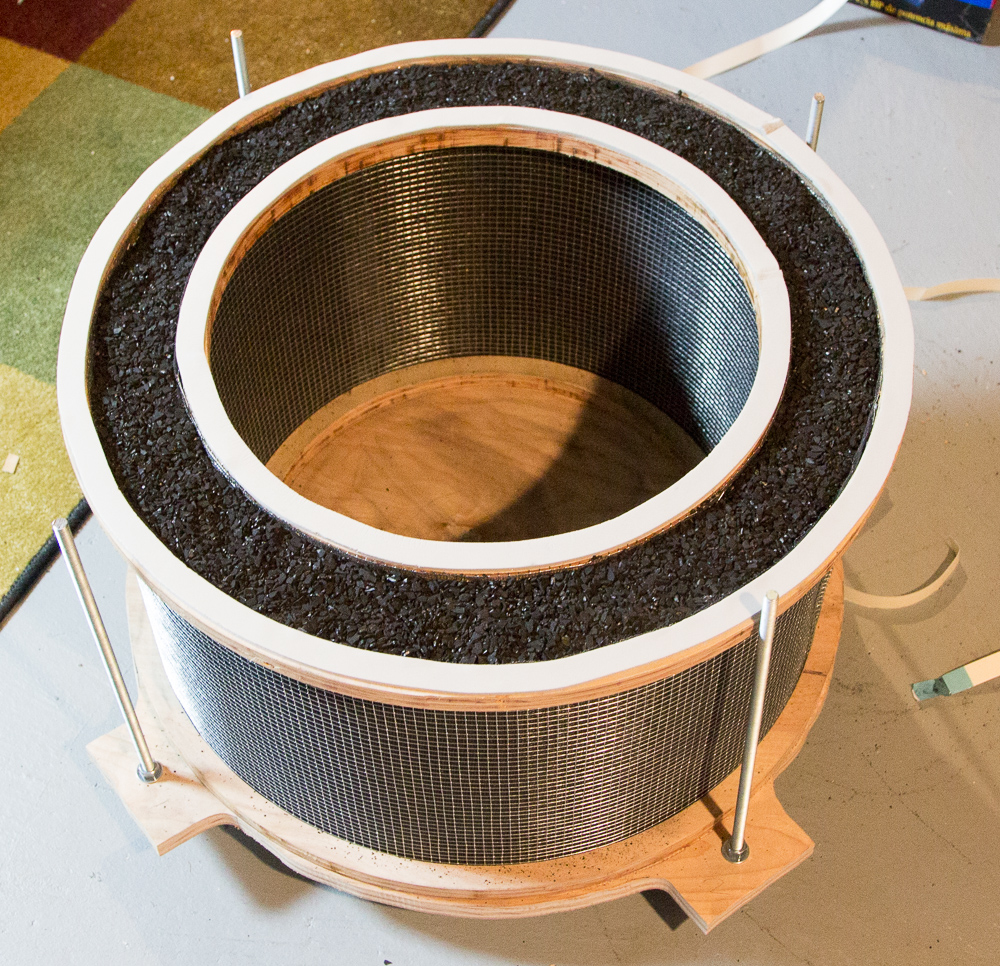
Activated carbon is placed between two cylinders covered by a hardware metal cloth and a fine mesh window screen material. Bases and tops of cylinders are cut out from the 3/4″ birch plywood. Same material used for base and top of the fume extractor body.
Fume extractor is held together by threaded rods. Weather stripping and caulking added between layers to prevent any air from escaping.
Tools and Materials:
Materials:
All materials are listed in the instructable so I’m not going to duplicate this information here. The only different part that I used was air conditioner foam filter. Instead of you can just use any cheap foam filter, as long as it’s 1/4″ thick and 24″x 15″ and pretty much every hardware store carries this size.
Tools:
Again almost all tools are the identical to the instructables with few exceptions:
I used fixed base router instead of plunge (because I didn’t have one) and I used manual stapler instead of electric one, because it just worked better for me as strange as it sounds 🙂
Also I used band saw instead of jig saw.
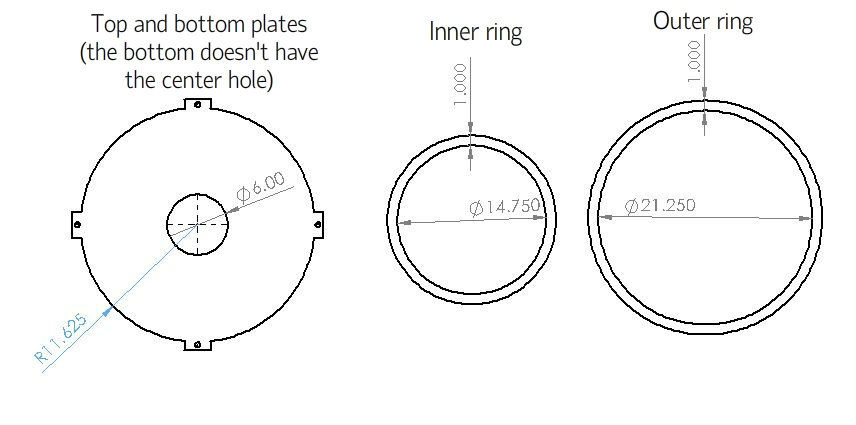
Part I: Making disks and rings
This is probably the hardest part of the project for anyone who is not very experienced with woodworking. Goal is to cut out two sets of two rings as well as top and bottom parts using router and other tools. To make rings, you will need to make a circle cutting jig for your router first (unless you already have one). It is also recommended to use plunge router, but since I didn’t have one I’ll show how to do this with fixed base router.
To make jig, you’ll need to find a board that’s wide enough to fit base of your router. Mark and drill holes for router base screws. You’ll have to countersink them so board can move on top of the material being cut. And don’t forget to make hole for the router bit. If you have plunge router, that’s easy. I had to measure and drill one, and came out a little bit off the center…
Now you need to drill holes at various distances. These are pivot points to that will be at the center of the circle you are cutting. My calculations were initially off because I didn’t take into account router bit width (1/4″ in my case). So please double-check my numbers. Also diameter of the holes depends if you use dowel in the center. I just used a screw, so holes were small.
- First hole (outer ring/outside) : 11.875″
- Second hole (outer ring/inside):10.875″
- 3rd hole (inner ring/outside):8.625″
- 4th hole (inner ring/inside):7.625″
Above numbers include 1/4″ diameter of the router bit. If your bit is smaller, take that into account. Honestly it doesn’t make huge difference. My rings came out to be 3/4″ wide instead of 1″ and it was still ok.
Cutting rings.
If you are good with router, you can probably skip this part.
Take your 8 ft long plywood and draw line at 4 feet mark, essentially dividing it two equal parts. You can cut it along the line, but it’s really not necessary. Then find and mark center of each part (2 ft and 2 ft). Drill small pilot hole for your screw that will be holding jig.
At first you going to cut a disk out of square plywood. Then you will be cutting big rings first, and then smaller ones. There’s no other order that will work 🙂
Don’t forget to put some scrap plywood under your work piece otherwise you’ll cut/scratch your workbench when making final cut.
3/4″ inch is very thick wood, so router will have hard time cutting so much material in single pass. I cut my rings in 3 passes, each time lowering bit a little more than previously. Even so, I had a lot of smoke and sawdust catching a little fire. Make sure you do this outside or in very nicely ventilated area. I did all the cuttings in my garage, and had to open door after I was done (couldn’t keep it open cause it was -10F outside), because smell of burning wood was very very strong. Also sawdust covered EVERYTHING.
It’s good idea to use strong vacuum to suck out sawdust as you cutting. I made a long video about whole cutting process, fortunately for you I edited and sped it up 🙂
But here’s description in case you don’t want to watch it. If using fixed base router, don’t attach router to the jig yet. Very loosely attach your jig to the center of first half of the plywood with screw at the furthers mark. Mark plywood thru the router hole. Remove jig and reattach at next hole, and mark again. And repeat this the rest. You should now have 4 marks on the plywood. Drill thru these with 1/4″ (or whatever your router’s bit diameter) drill bit. I actually realized that I can do above in one shot after I finished (I was doing one hole at a time).
Now attach router to the jig. Screw in your jig loosely at the outer circle pivot hole (furthest). Extend router bit to about 1/4″ down, and make sure it goes into pre-drilled hole. Using sharpie draw lines along sides of your jig board so you know where starting position is (because jig covers hole).
Turn router on, and start slowly circling your first cut. When you are about 3/4 of the way, it’s good idea to stop and vacuum sawdust from the track. Continue until you reach starting position. Now lower bit some more (i.e. 1/2″). Your pre-drilled hole should allow this. If you have plunge router I imagine you won’t need pilot holes, but I never used one so I can’t tell you :). Do another circle. Lower all the way until you see router bit poking from beneath just a tiny bit. Since it’s going all the way thru, it will cut small channel on the whatever you have under your plywood so make sure it’s nothing valuable 🙂
Now you should have a nice disk! It will not be perfect, but that’s ok. Remove and put aside rest of the plywood.
Now attach your jig at next hole (outer ring/inside) and cut like before. You should now have your big outer ring! Continue with same steps and cut smaller inter ring.
Now cut another two rings from second half of the plywood.
Using big flat file, smooth out edges removing all splinters, etc.
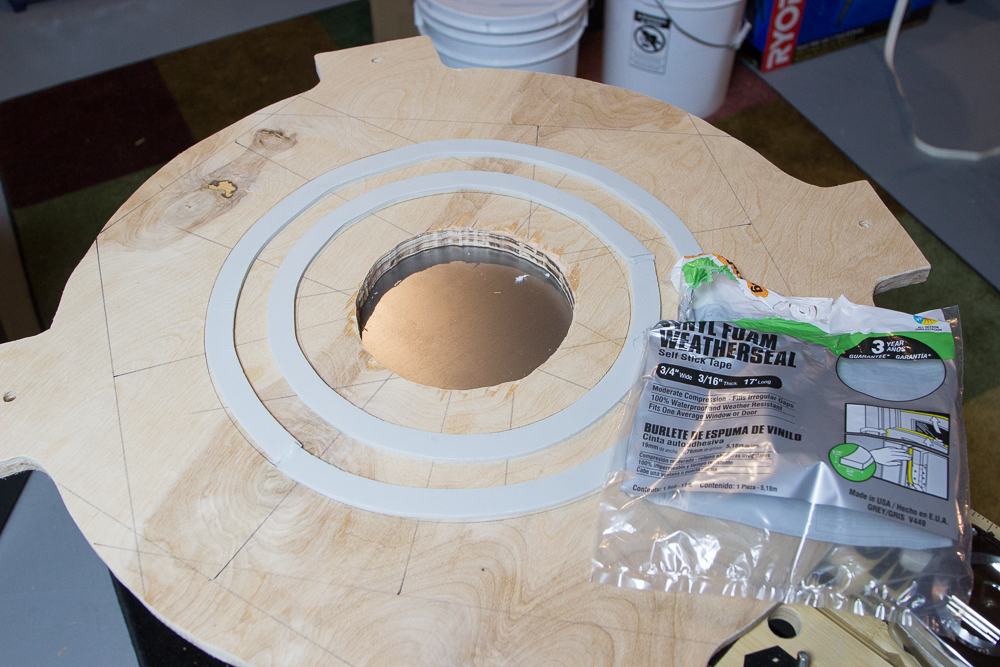
Cutting top and bottom pieces.
Original instructable again doesn’t mention much details about making this, other than using jig saw. So here’s how I made mine (I actually used band-saw instead of jig saw).
Just like with rings, mark a line at 2 feet on the plywood, making two halves. This time you actually want to cut it in two 2’x2′ pieces.
I made a detailed video of how it was done, you can watch it here.
It is pretty self explanatory, but here are few things that worth mentioning:
- I made second piece by outlining first one.
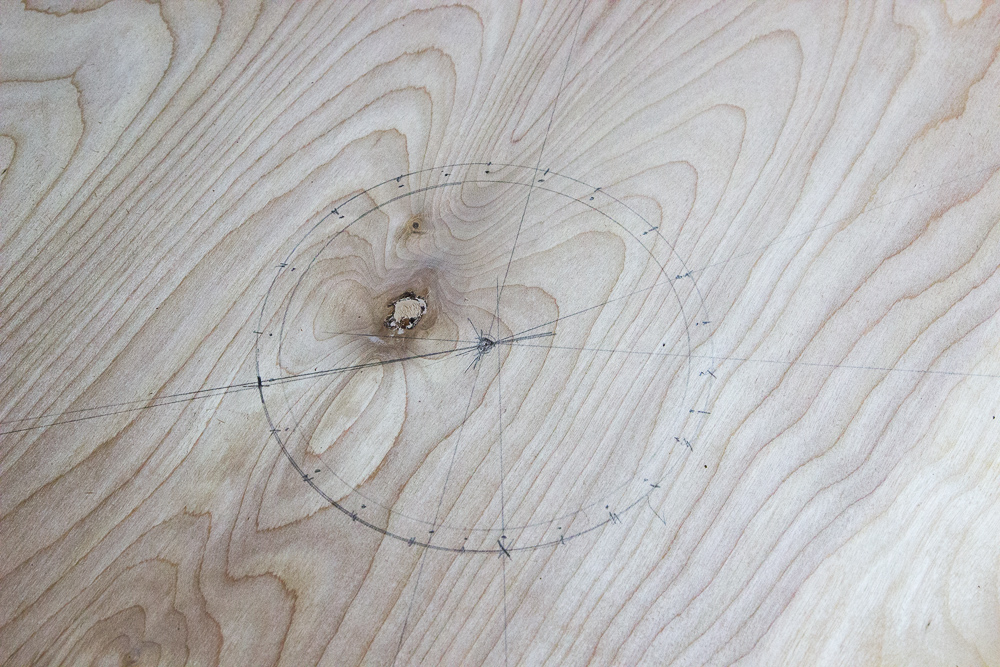
- One one of the parts has a hole in it (6″ diameter)
- Center of the hole can be found by drawing some lines connecting sides of the circle, and then drawing perpendicular line from middle of each of those lines. Eventually these perpendicular lines will intersect at the center!

- That hole was very hard to make. It was too small to use a jig, so I drilled a bunch of little holes and then cut them with a router.


This didn’t work out very well, as hole was very uneven resulting in fan not sitting very tightly. I had to use a lot of caulk to seal air leaks and fix fan in place.
If you know a better way to cut hole, do it.


Also if something is not clear, please make sure to leave question in the comments!
Installing Casters.
[fusion_builder_container hundred_percent=”yes” overflow=”visible”][fusion_builder_row][fusion_builder_column type=”1_1″ background_position=”left top” background_color=”” border_size=”” border_color=”” border_style=”solid” spacing=”yes” background_image=”” background_repeat=”no-repeat” padding=”” margin_top=”0px” margin_bottom=”0px” class=”” id=”” animation_type=”” animation_speed=”0.3″ animation_direction=”left” hide_on_mobile=”no” center_content=”no” min_height=”none”]
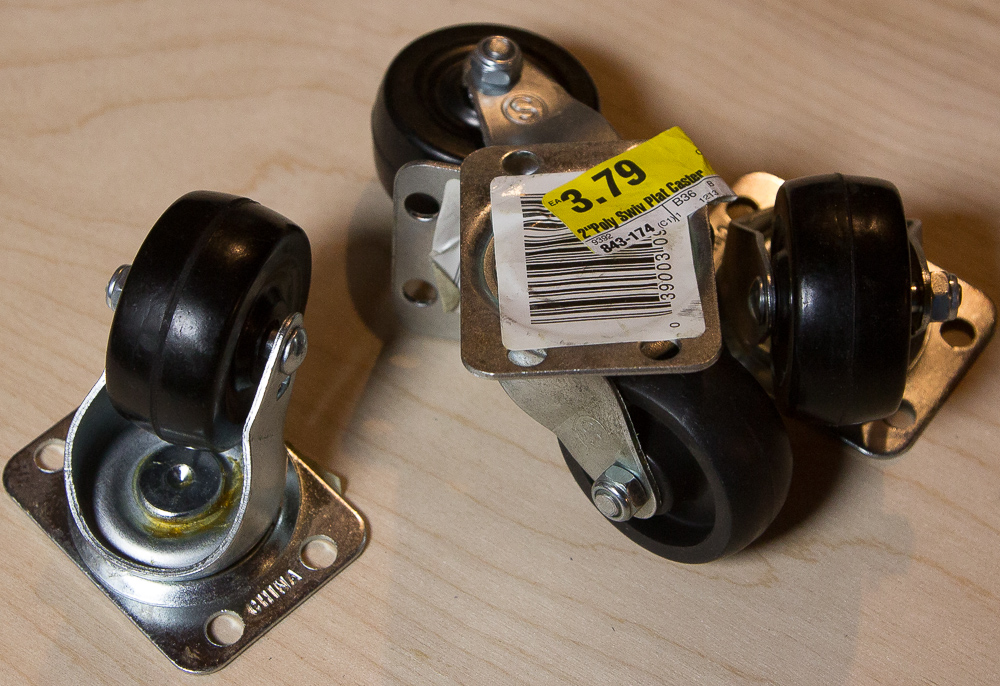
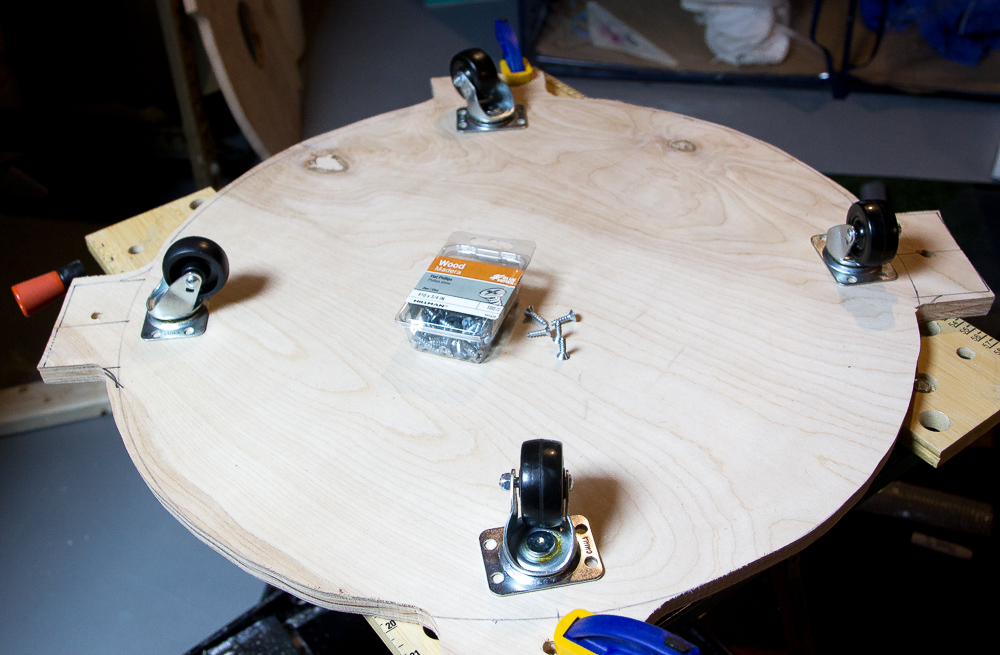
No surprises here, this was the easiest part. Do not skip it tho, filter will be super heavy! Casters work well even on carpet.
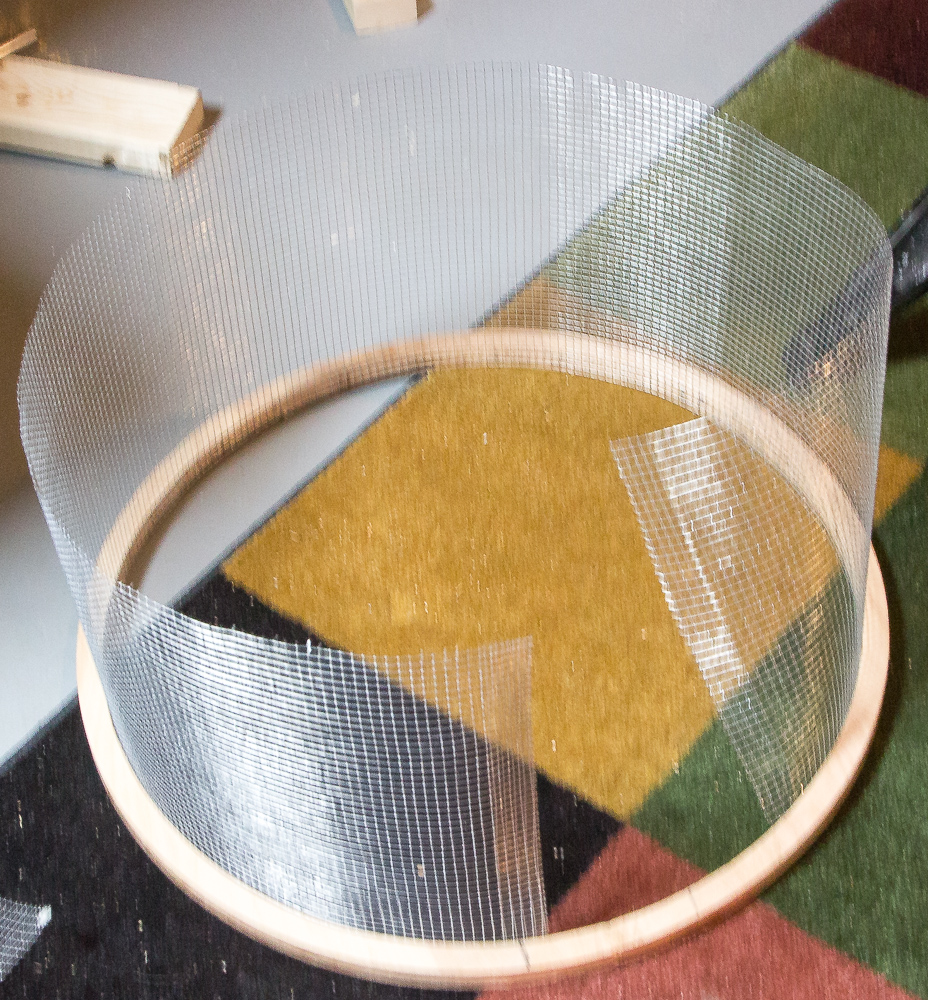
Screen and mesh.
This part took me some time to do properly. Biggest issue that it looked like author miscalculated how much wire cloth was needed. It’s also possible that because my rings were slightly smaller I needed more, but even if you manage to pull a miracle and cover both cylinders with 5 feet of this stuff, you won’t have any left to make pre-filter cylinder.

I have both electric and mechanical staplers, and I found that mechanical worked a lot better than electric.
Cut mesh like mentioned in the instructable, and staple to the inside of outer rings and inside of inner ring. I did inner rings first.
When I proceeded to the outer rings, I actually compared it’s height to the inner ring. Height must be identical. As you can see I also didn’t have enough of the wire cloth so I had to buy more and staple missing piece overlapping existing cloth.
Once both rings had wire cloth attached nicely, I cut measured and stapled mesh screen. I used aluminum window screen, and it was messy.

Use plastic one! Also I had to re-do screen several times because it was hard to staple it so there are no gaps and it’s even on both sides.

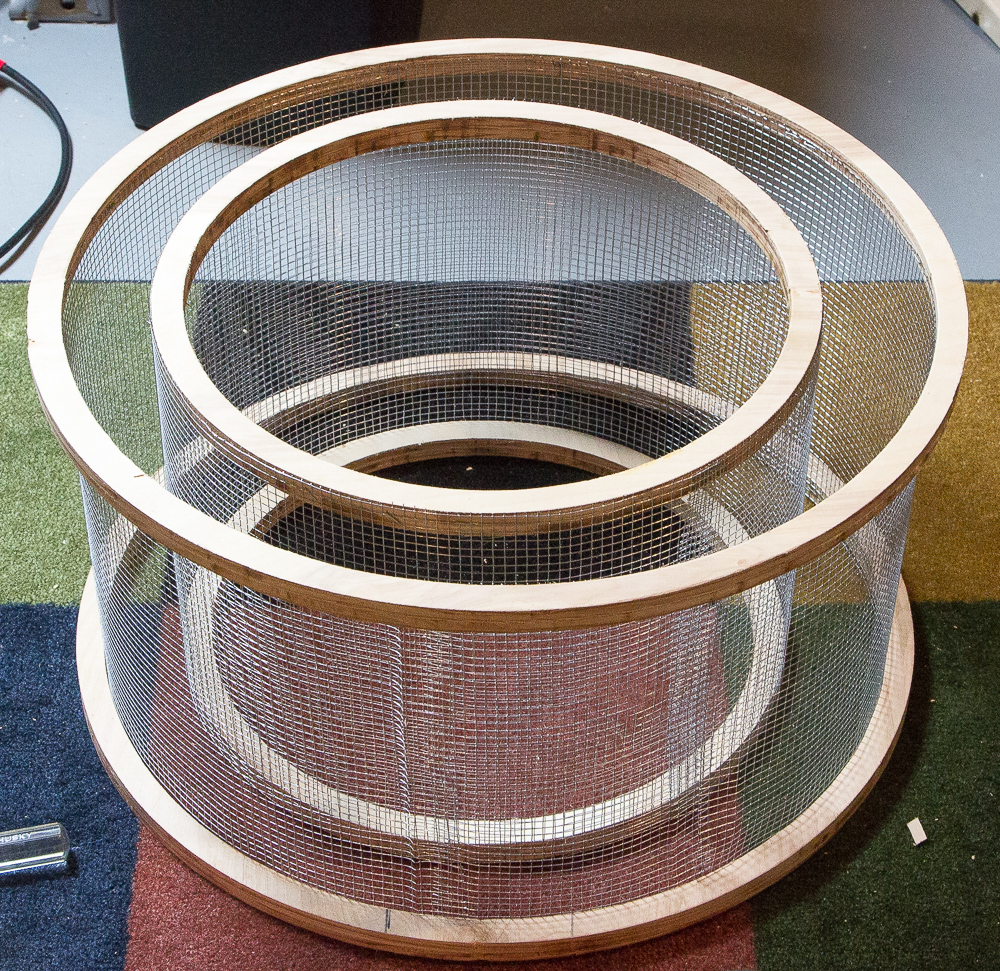
Glue cylinders to the base.

No surprises here. Just make sure you align them well. Let them dry overnight.

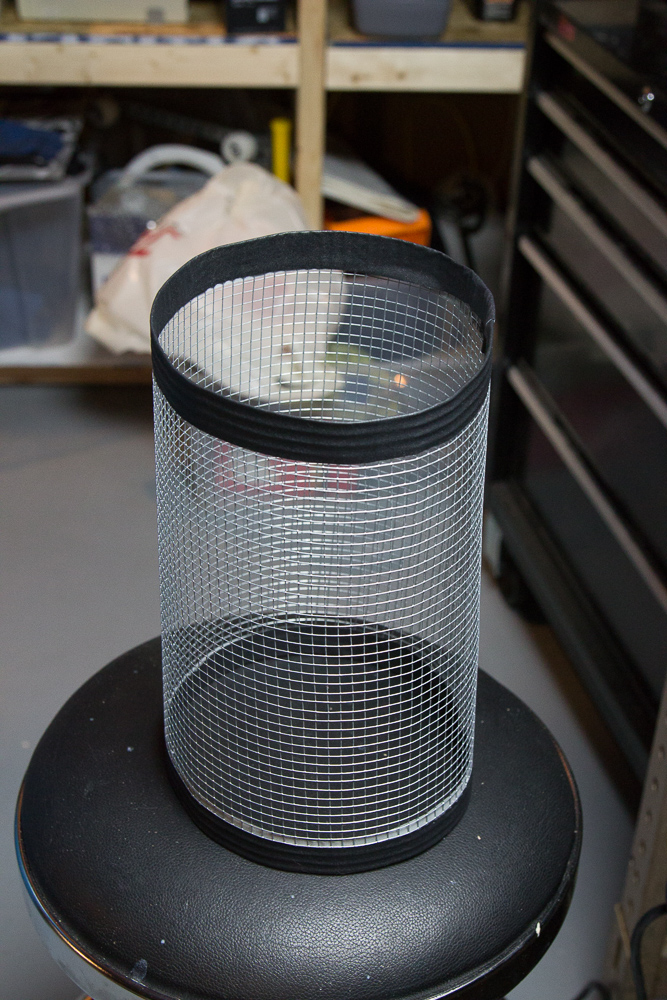
Pre-filter and air baffle.
How to make pre-filter was explained well and doesn’t need any more comments other than as I mentioned before: if you only got 5 ft of wire cloth, you won’t have enough to make pre-filter cage.
Here are pictures of the build:


Air baffle, had me baffled (pun intended) as I didn’t have my laser cutter running yet. So I cut one from mat with scissors. It was hard but doable 🙂 Mat breaks easily so be careful when bending it. Also that saw-like part is longer than required, you will be cutting off some “teeth”.
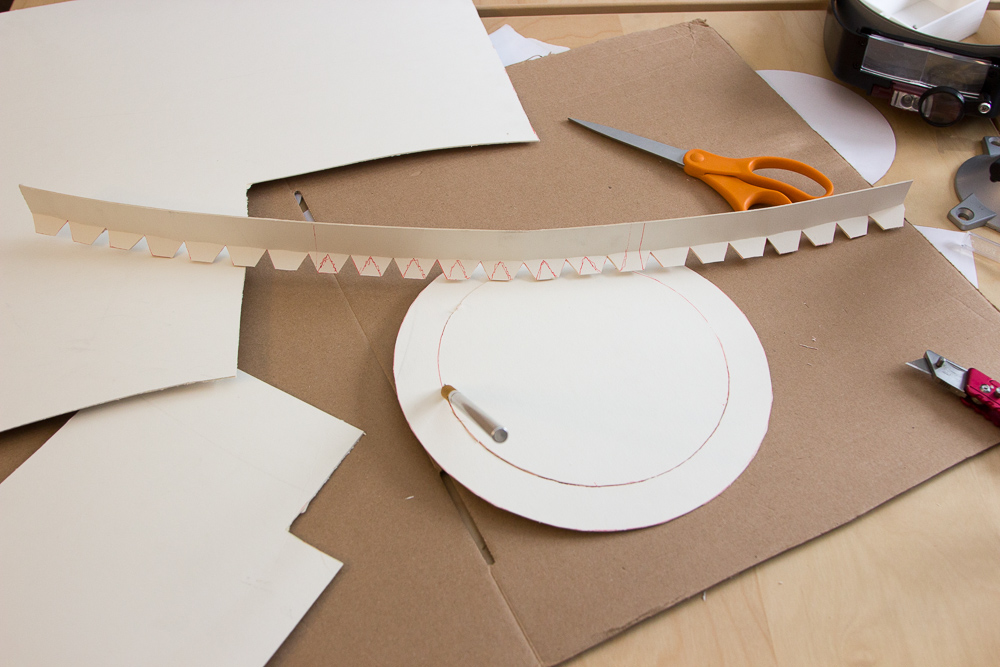
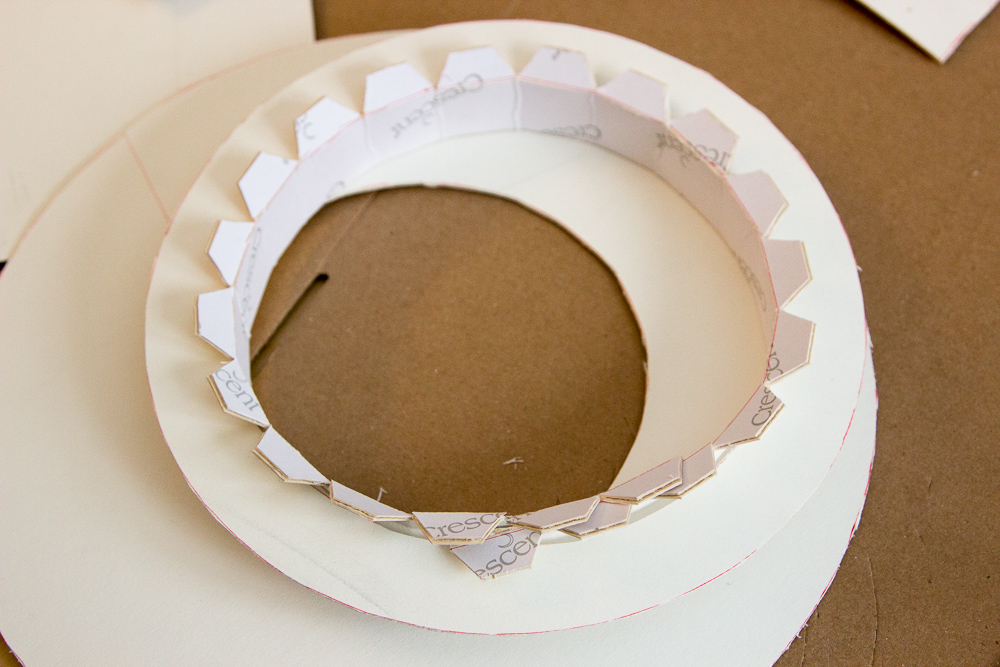

Later on I found already pre-made metal piece (duct collar?) at Lowes hardware store in plumbing section, that probably can be used instead of this paper one.
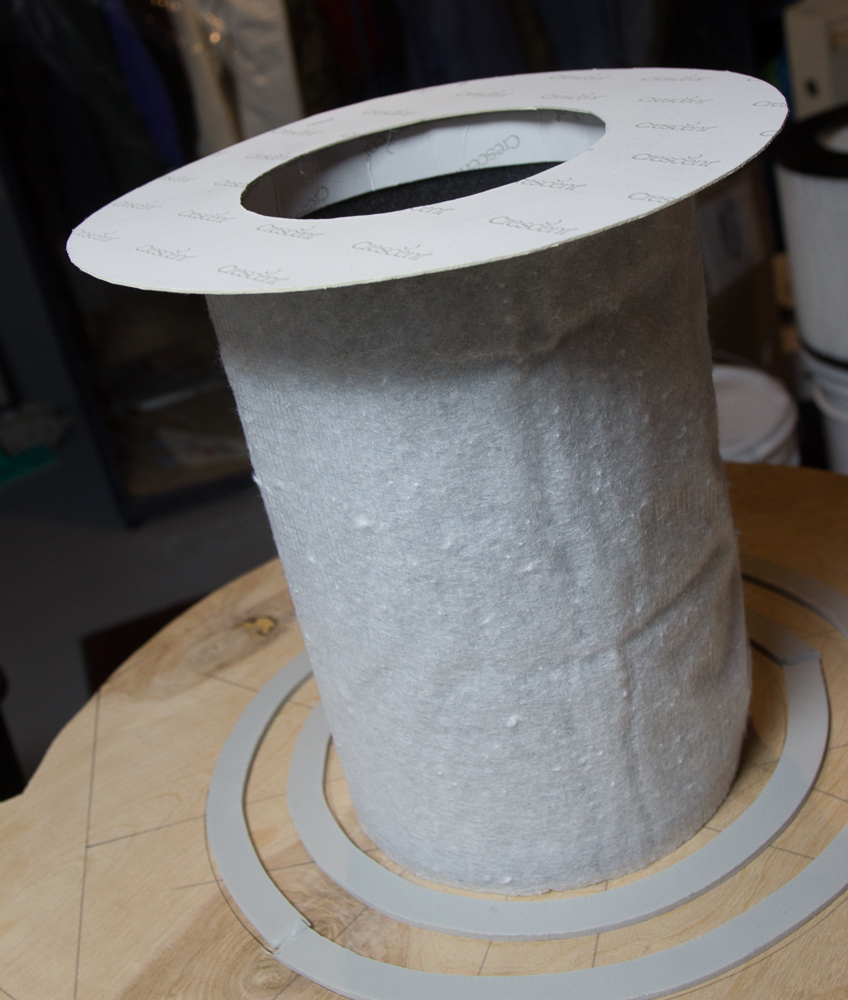
Finished pre-filter with baffle
Carbon fill up.
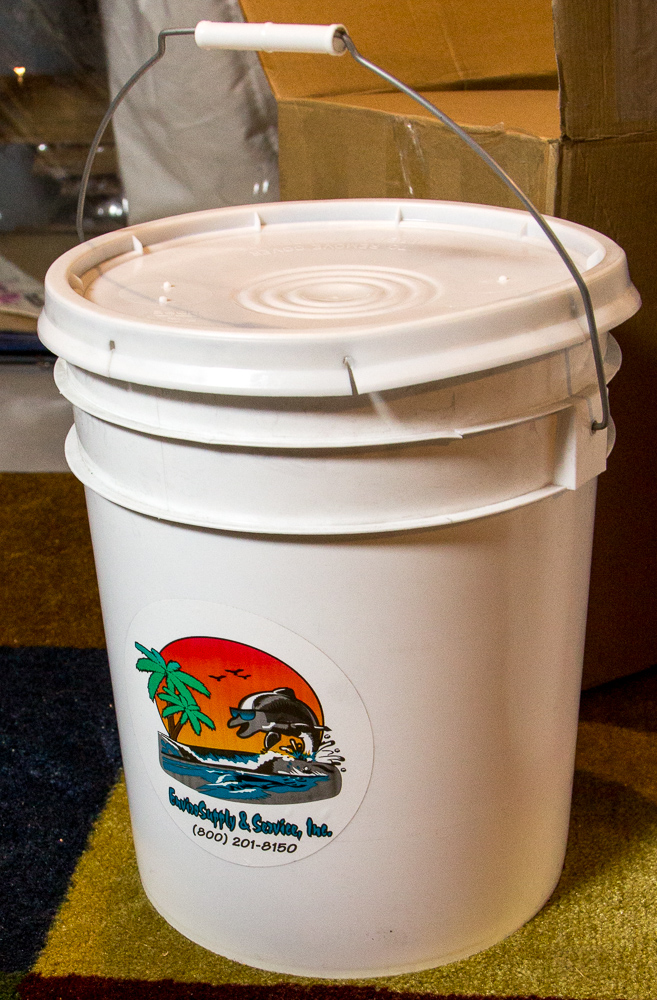
I got my carbon from same source as author, but mine came in 2 plastic buckets.
Since it was middle of the winter, I couldn’t fill my filter outside, so I had to do it inside very very slowly and carefully. I use metal scoop to carefully fill carbon between cylinders.
I was careful not to spill it over the top, but a lot of carbon dust seeped thru the mesh, to my surprise 🙁 But before you fill it up completely read this!
Here’s really important part!
I’m going to run ahead of sequence to save you from making same mistake I made. After my filter was ready, it didn’t really work. Nasty fumes were seeping thru somehow. As I discovered they were just going thru top of the carbon which settled down and now there was a gap. But what was even worse is that I think plywood itself let gasses seep thru. To prevent this from happening I put some strong duct tape on top of it.
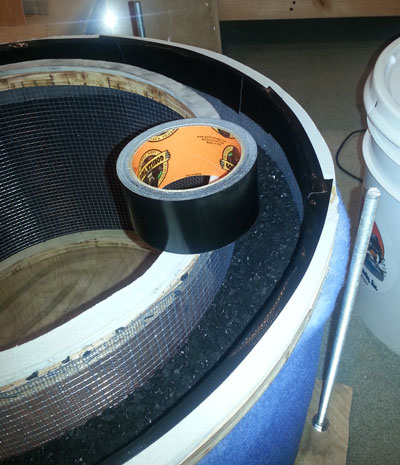
After you do that, fill remaining carbon covering tape. Attach top part of the duct tape to the to of the outer ring. You will attach weather stripping on top if and when you close filter it should hold tape well.
Make sure you let carbon settle, and shake and bang your filter slightly so it levels up. I had to top it off several times, until it stopped settling.
Weather stripping
I didn’t have any weather stripping, so I bought this kind from local Lowes store. It’s very inexpensive and you will probably need 2 packages. I actually used different sizes, but I don’t think it really matters. However you must use it, or your filter will leak bad.
Stripping is quite flexible and you will not have any trouble placing it in the circle. Just keep removing top paper backing because it prevents it from flexing. Go slow. Once it sticks, it’s almost impossible to remove without blade.
The rest
The rest of the build was pretty uneventful. Just follow steps from the instructable to assemble extractor.
I used generous amount of caulk around fan, because my 6″ hole was less than perfect. It’s a little tricky to insert paper baffle into pre-filter, so I do it first, and then close cover with attached fan taking care so it fits into baffle. In order to do this correctly do not install threaded rods yet, or just lower them so they are not in the way of top cover. Once everything is closed tighten filter with threaded rods. Don’t over-tighten tho, because all that’s holding filter is wire mesh. You’ll probably start hearing some nasty cracking sounds when you tighten it too much.
Wire the fan if you haven’t yet.
Now here’s another important part. Author doesn’t accent how important that blue post filter is. I didn’t buy it and when I turned on fume extractor a lot of carbon dust started to blow out of it like black smoke! Post filter does a nice job of containing this dust.
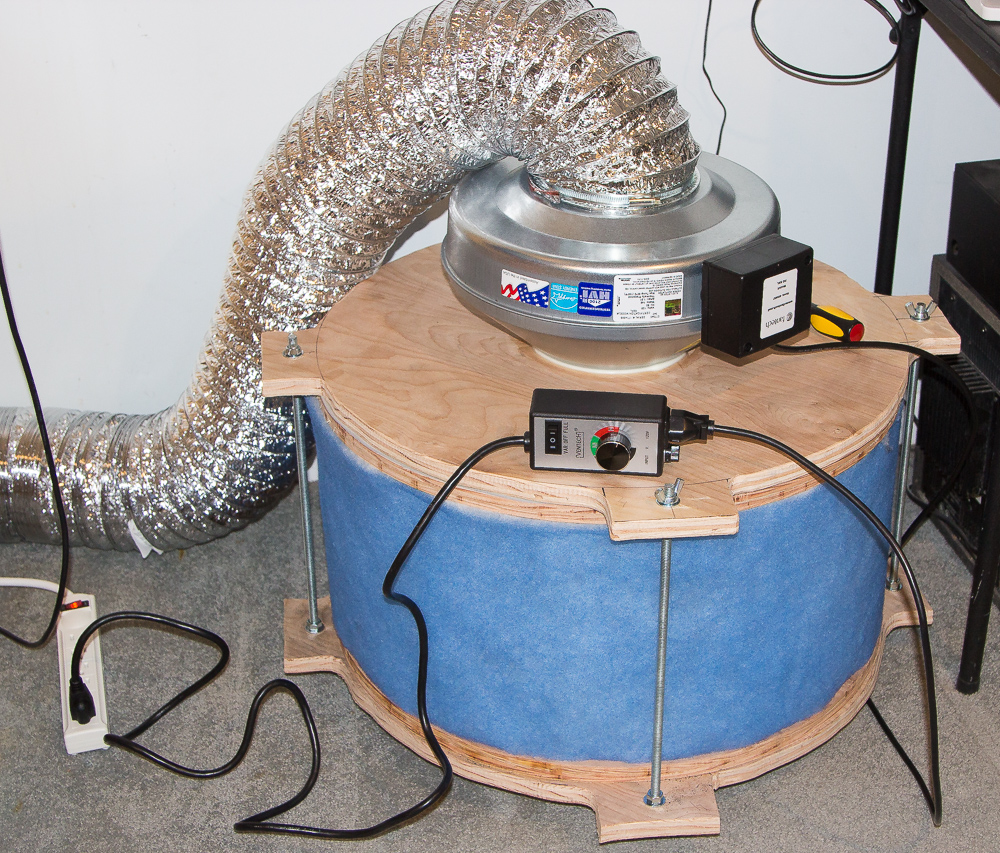
To connect filter to your laser cutter you will need to get a flexible duct. One that comes with cutter, seems to small and fragile. I got 6″ foil duct from local hardware store, it’s way too long, but it contracts nicely. I also got 2 6″ clamps to hold it in place. Here’s what it looks like after everything is connected:
Issues and remedy.
I spent a lot of time and money building this thing. So when I hooked it up to the laser cutter and started to cut some acrylic I was really pissed, because nasty smell of burned acrylic filled the room. Its like filter was not even there.
I took it apart and noticed right away that I was missing about 1/2″ of the carbon on top. I already mentioned it earlier that you need settle it really well when you fill it. But I didn’t do it in the beginning. After I added more carbon and shook filter and then added some more I closed lid, checking for a good seal and tried it again. It still smelled.
I used very scientific method of detected location of the leak by starting laser cutter and immediately dropping on all 4 and sniffing around the filter 🙂 Smell was coming from near top of the outer ring. I added second layer of weather stripping and tried again. Still no luck.
That’s when I tried duct tape, and it really helped. My guess, fumes were leaching thru less dense layer of carbon and thru the plywood (which did have a little gaps in layers from routing). Duct tape helped to reinforce top layer and after that things improved. I can still smell a little acrylic when cutting, but then I discovered something interesting. Acrylic that I was using was clear type and I got it from some big bog hardware store (i.e. Home Depot or Lowes). I’m guessing it was extruded kind. When I got some colored cast acrylic from online, it didn’t have much smell and filter was able to completely eliminate odor! So it does matter what type of acrylic you use.
Final thoughts.
Important question is how long filters would last?
Pre-filters have to be changed pretty soon. I was test cutting some wood and when I was fixing issues with fume extractor I was opening it several times and I noticed that white 3M filtrette filter turned brown. And that was just few cuts! I’m guessing it needs to be changed every couple of months or sooner, especially if you are cutting wood.
In fact I had filter for about 3 months now and I just replaced inserts in the pre-filter. But I wasn’t using my laser cutter that much, so you might have to do it within a month if you are using it 8 hours a day.
I’m hoping that carbon filter will last at least a year becuase it’s really expensive. Author of instructable mentioned that he used only half for his filter, but I used 3/4 of it so I’ll have to order another 55 lbs next time.
To be honest I don’t think this is the best design for fume extractor. Biggest flaw is that carbon is more dense on the bottom due it it’s own weight so it will not saturate evenly. It would’ve been much better to build square extractor where carbon filter is above or below air flow. Once I use up HEPA filter I’ll probably try building a different extractor.
Advantages however are that it’s a functional design, and you have very detailed steps on how to build it. I’ve used it for over 3 months now, and it just works![/fusion_builder_column][/fusion_builder_row][/fusion_builder_container]


Related posts

Help! Why is my image mirrored!? We have ALL been here. It’s frustrating. The image is mirrored and now your design is screwed up. How... Continue reading

Has this ever happened to you? You’ve created the perfect design in your graphics software, set up your cup on the rotary (hopefully a PiBurn!),... Continue reading

So, you want to run tumblers! But which rotary is best? We asked 50 people with the PiBurn what their favorite rotary was. ... Continue reading

You might already know how versatile PiBurn Rotary Attachment is, but did you know that it can also make Popcorn? Continue reading

I’ve been using RDWorks to send jobs to my Laser machines for many years. Fortunately there’s a new game in town and it’s software called... Continue reading